This simple guide will teach you how to clad concrete steps in stone for a better looking porch and home. If you ever wondered how it’s done, read on.
Curb appeal is the primary reason for redecorating your porch. Not only is it inexpensive to redo your porch, but it’s relatively simple as well.
You do not need a contractor. All you need is a trip to your favorite home improvement store and a free afternoon. Find a stone that you love. Of course, you could find a design in a magazine that you love and go from there.
There are so many unique ideas that look like they would be hard to complete which are not difficult at all.
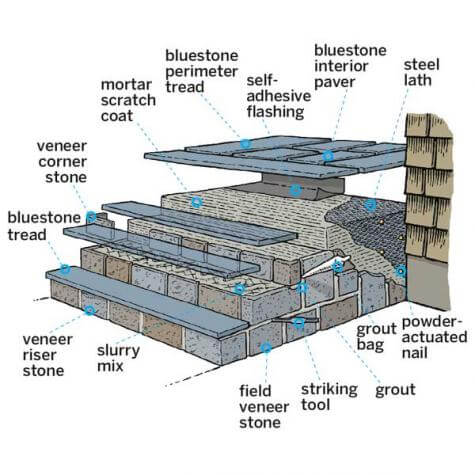
Image by Gregory Nemec
In the following paragraphs you will learn all you need to know about how to clad your concrete steps in stone.
Cleaning Is Essential when you place concrete steps in stone
Cleaning is easy. You need to first sweep away any lose debris. You can do it with a broom, but for best results you should use a hand broom.
Make sure you get all the edges. Every bit of dust that hangs on can make it harder for your stone to stick.
Then you need to take soap and water to wash the concrete. This will help to remove all the dirt that is stuck to the concrete.
It will help reveal cracks in the concrete as well. Make sure that you let the concrete dry completely before you move on to the next step.
Create a smooth surface
Concrete by nature has a round feel. You need to sand it down and create a smooth surface so that the next step will be easier.
You will need to pay close attention to the edges of the steps. They tend to be the roughest part of the steps.
After you finish sanding it down, you will need to wash it down with water. This will remove any dust that you created when you were sanding.
Let it dry completely. More than likely, this will be the hardest part of the cladding concrete steps in stone project because it is time consuming.
Repair gaps and cracks
Repairing gaps and cracks can be done a couple of different ways. First, you can get filler that you simply pour into the gaps.
It is the easiest way to fill large gaps. Smaller cracks will need to be filled individually with a spade.
You can find repair kits in any home improvement store. Once you have the cracks and gaps filled, you will have to sand the area down again.
You will also have to wash it thoroughly and remove any dirt. Do not forget to let the filler dry before you sand it down or wash it.
This way you do not compromise the integrity of the filler.
Protect surrounding area
Once you are ready to apply your stone, you are going to want to make sure that you put something down to protect the railing, porch, and any plants that surround it.
You can use painter’s plastic to do this. It will be the easiest thing to use. For smaller areas, you can use trash bags.
You just want to make sure that if you do accidentally spill your refinisher that you do not ruin anything important.
You will want to lay your stone out and decide on a pattern at this point as well. Once you apply the refinisher, it will be hard to move the stones around.
Apply refinisher
Applying the refinisher is easier than you might think. You can get some that is premixed and all you need to do is apply it.
You simply lay a thin flat layer across the concrete step. Then you will place the stone on top of it. You will need to wait for it to dry.
Depending on what the packaging says, you may need to wait up to a full day for it to dry.
This does not mean you have that much time to move your stone around. In most cases, the stone will be stuck in about half an hour.
That means if you pull it up, you will need to smooth the area all over again.
Tips for placing your stone
There are several tips and tools that will make your job a little easier. For instance, spacers will help you to create a design with your stone.
They will sit in between the stone until they are set and then you can simply remove them.
A level will help you to make sure that you have the stones even and firmly in place.
Sealants
A sealant goes over the top of the stone. It will help your stone to stay in place. It will protect your stone from rain, wind, and snow.
Sealants can be intimidating. Especially if it is your first time using them. They usually go on opaque. Which means they look cloudy. They also go on thick.
At first, if can look like it is going to look terrible. You may even feel like it is ruining all your beautiful stone work.
That is normal. Just apply it like the directions say to. Then let it dry completely.
Try to keep tiny humans, birds, and animals away from it until it dries completely. Otherwise you may have some interesting little footprints in it.
Also, you may want to watch from leaves and debris to keep it from sticking to the sealant.
The Final Step
Once everything is done and dry, you will want to wash it one last time. This will help you to get the perfect look that you are looking for.
It will ensure that all the dust and debris that may have landed on it will be freed and not permanent.
Do not forget to take pictures so you can show off all your hard work to your friends.
There you go! You can cover to your concrete steps with beautiful stone so that you create an whole new feel to your space.
It is simple to do. You only need a few hours. The hardest part is waiting for it to dry so that you can take the pictures.
Here’s a great video explanation of the process as well:
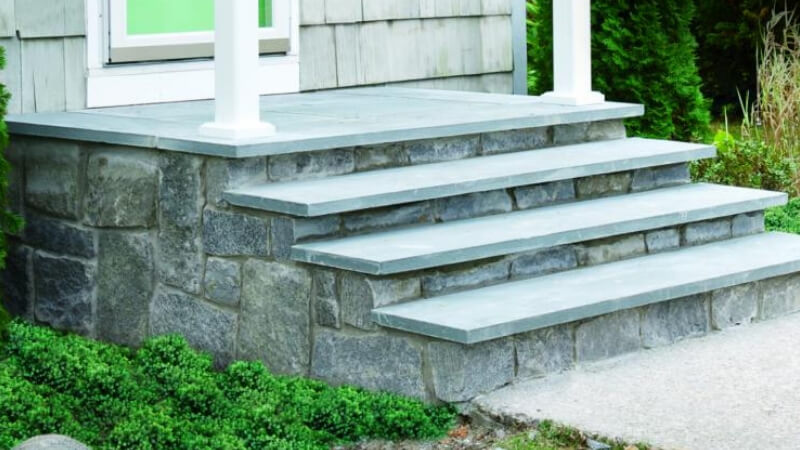
Feature image by Kolin Smith
